Bournville Tile Cleaning

Bournville Tile Cleaning

Welcome to my Work History archive where you will find examples of the cleaning and renovation of tiles carried out in Bournville.

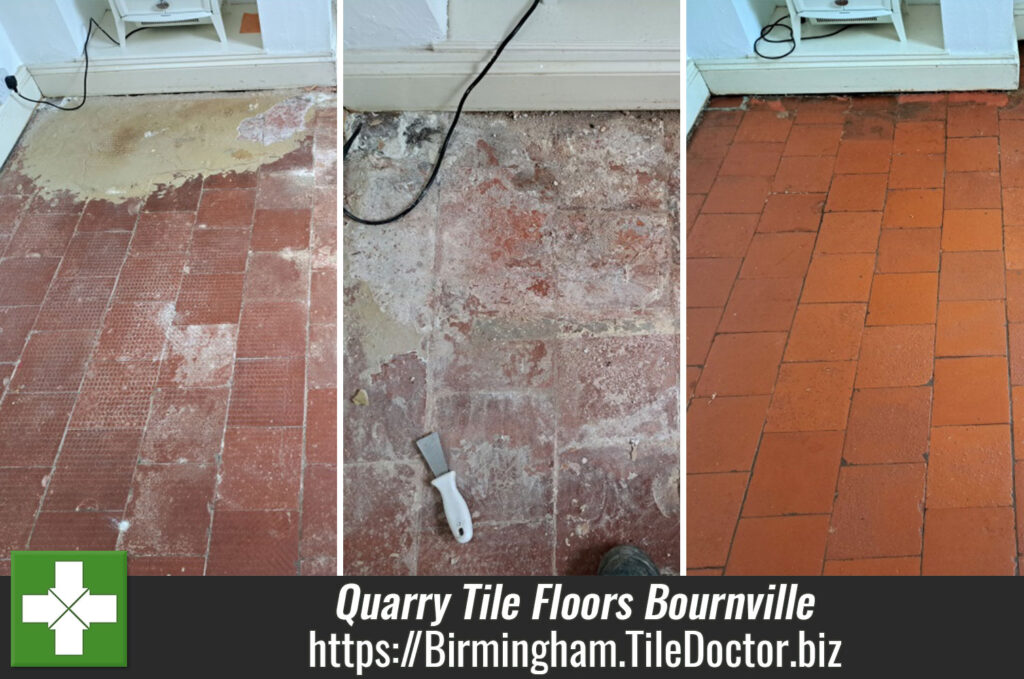
Quarry Tiled Floor Restoration Bournville

Multiple Neglected Quarry Tiled Floors Restored in Bournville

A customer had recently moved into a property in Bournville and discovered an original Quarry tiled floor in the living room, hallway and a couple of quirky tiled areas upstairs. After searching on the internet for some inspiration, they came across my previous work and got in touch. Period floors like these are very popular and so they were keen to have the Quarry tiles restored.
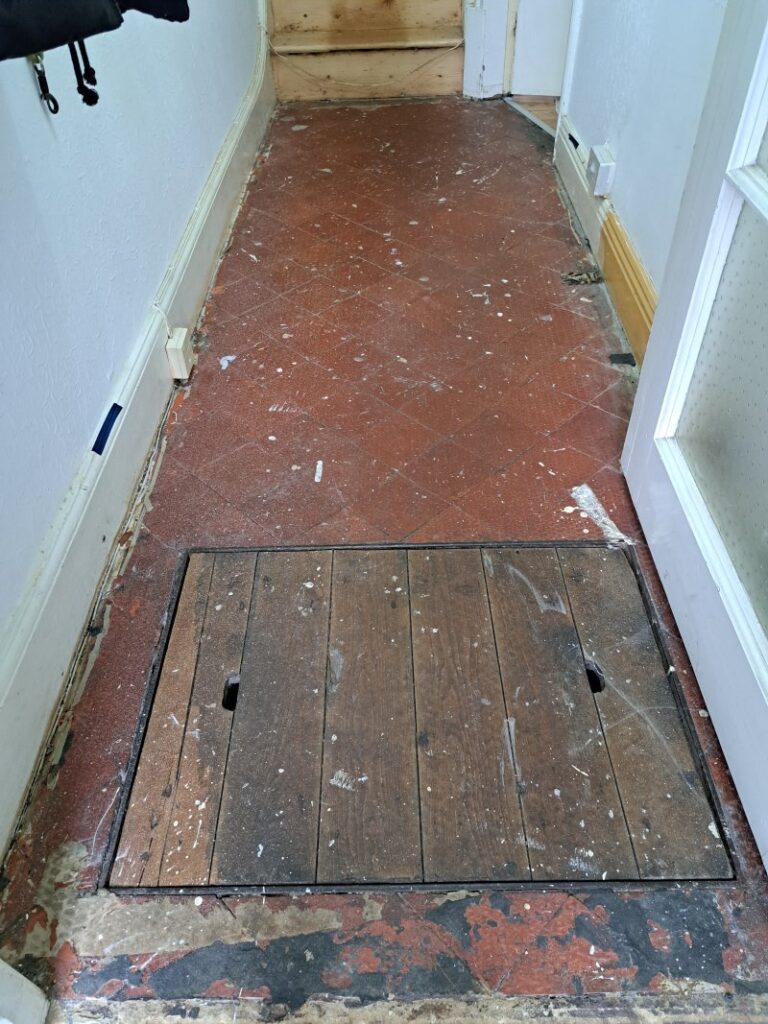
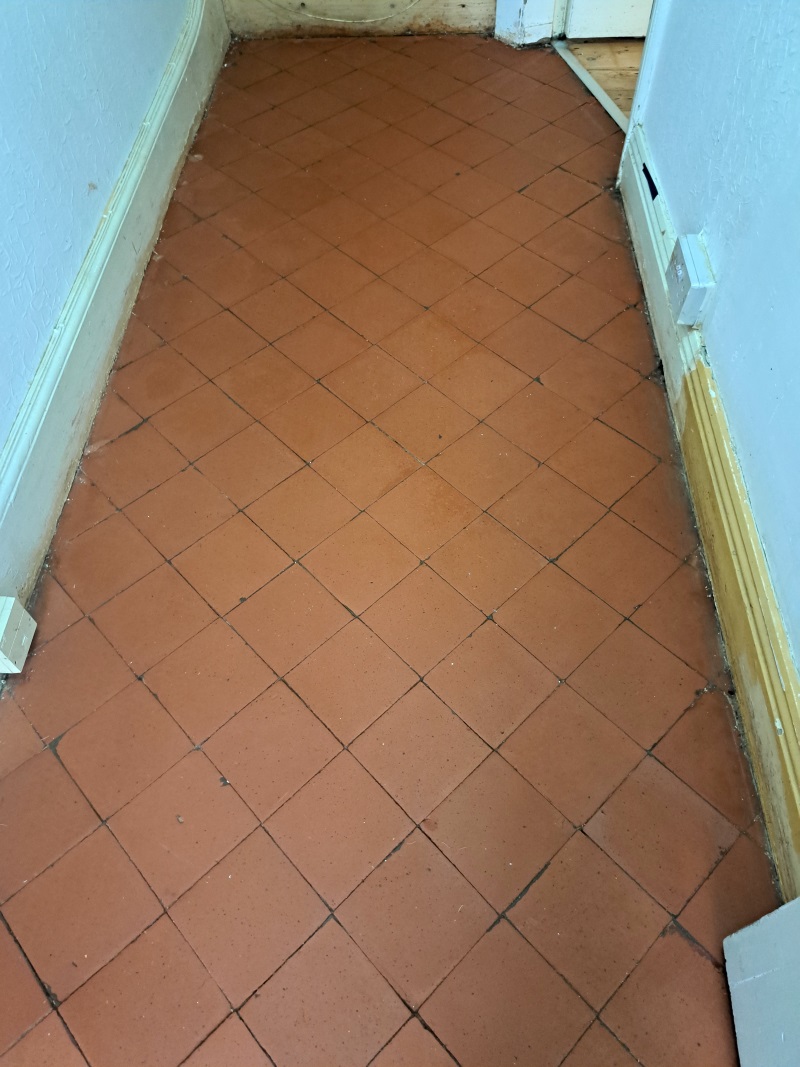
Quarry Tiled Hallway Before Restoration Bournville

I went over the property to survey the floor and made notes of all the floors and problems including the removal of self-levelling screed in the living room. This is often used to level tiled floors prior to the installation of another covering such as Vinyl or Carpet. It can be difficult to remove but it can be done. Another issue that would need to be dealt with was carpet glue and paint stains which I found in the hallway.
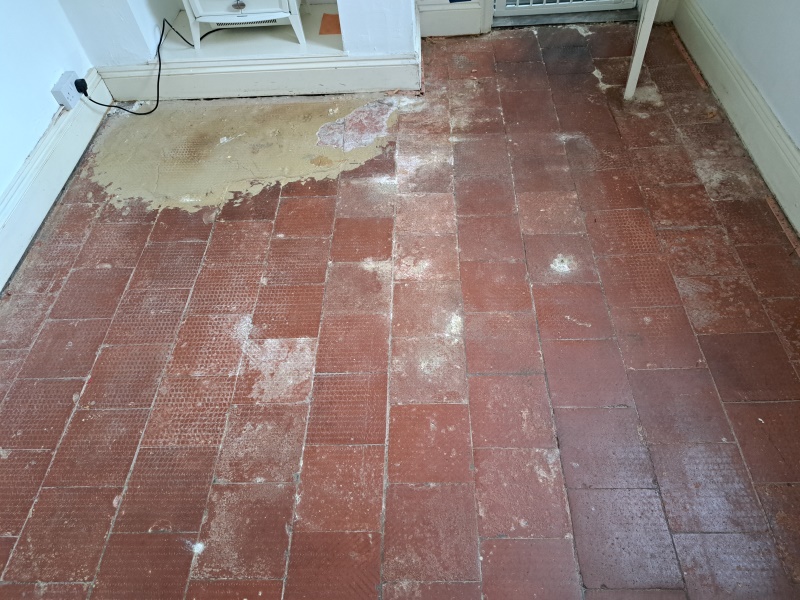
Quarry Tiled Floor Before Restoration Bournville

I worked out a detailed plan for the restoration work and was able to use this to create a quote for the work. Keen to have the floors restored my quote was accepted and a date set for the work to start.
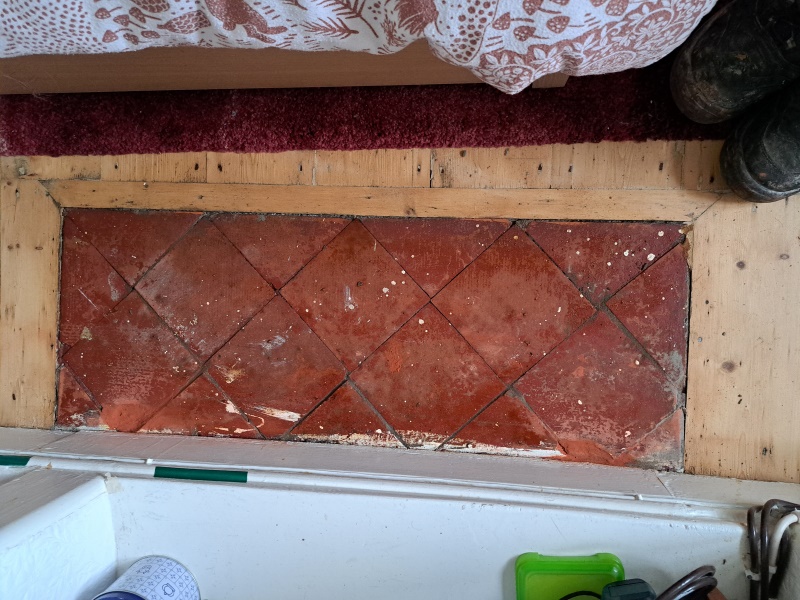
Quarry Tiled Hearth Before Restoration Bournville

Cleaning a Quarry Tiled Living Room Floor

The first day was spent removing an area of levelling screed from the living room along with a couple of repairs to the tiles. This literally has to be scrapped off the tiles by hand to remove the bulk of the screed. The whole floor was then cleaned with a strong dilution of Tile Doctor Remove & Go scrubbed in with a 120-grit carbide pad fitted to a weighted buffer machine. The resultant slurry was then extracted with a wet and dry vacuum.
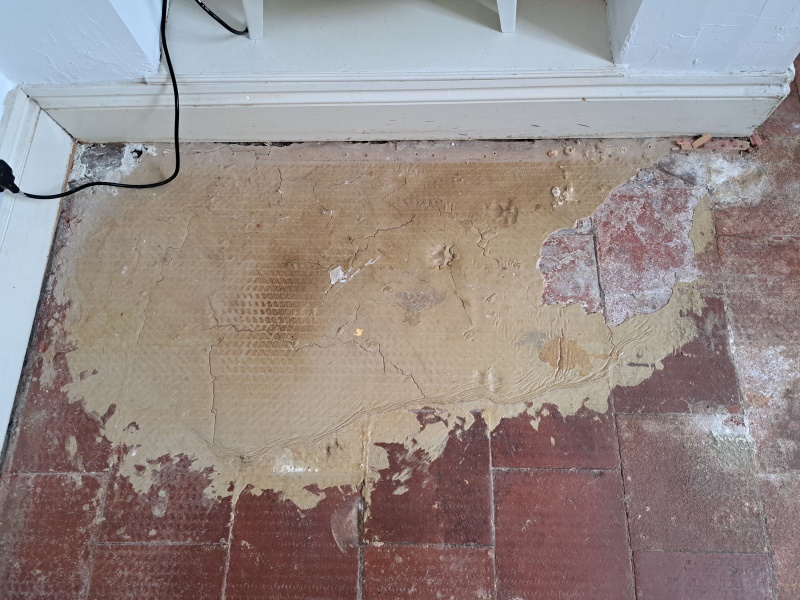
Quarry Tiled Floor Before Restoration Bournville

The next step was to give the floor an acid rinse using Tile Doctor Grout Clean-up which is ideal for breaking down cement residues. It was let to soak into the floor for ten minutes before being scrubbed. For this the coarse 120-grit pad was switched for a finer 240-grit carbide pad. The floor was rinsed with water and extracted again to remove the slurry.
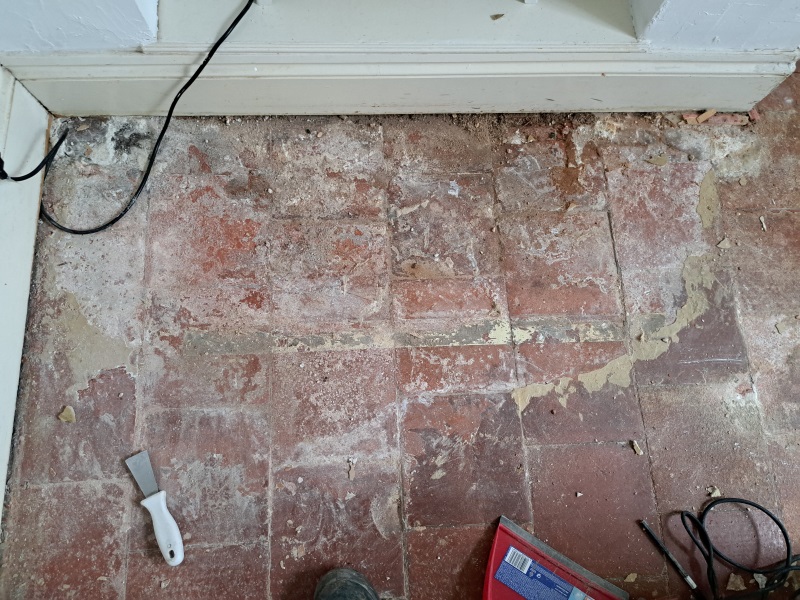
Quarry Tiled Floor During Restoration Bournville

After inspecting the floor, I was pleased to see that marks imprinted onto the tiles by the previous floor covering had been removed and the tiles were looking so much cleaner. Happy with my work the tiles were left to dry off overnight with the aid of a couple of air movers.

The next day I tackled the Quarry tiled hallway which was stained with carpet glue. The started with a steamer to loosen up year’s old adhesive and bitumen along with a scraper to remove dried paint. The hallway tiles along with a couple of tiled hearths upstairs were then cleaned using the same process as the living room.

After an hour or so of drying the tiles, I applied a coat of Tile Doctor Stone Oil to all the floors and left them to dry for twenty minutes before towelling off the excess. The tiles were then left to dry off completely overnight. Stone oil is the first step in the sealing process and adds colour, texture, and generally improves the condition of the Quarry tiles after years of neglect.

Sealing a Quarry Tiled Living Room Floor

On the last day I applied a coat of Tile Doctor X-Tra Seal to all the tiles to seal them. This sealer is an impregnator that soaks into the Quarry tile, occupying its pores and thereby preventing dirt from residing there. The tiles were then buffed with a White pad fitted to the rotary machine to remove excess sealer and bring up their appearance.
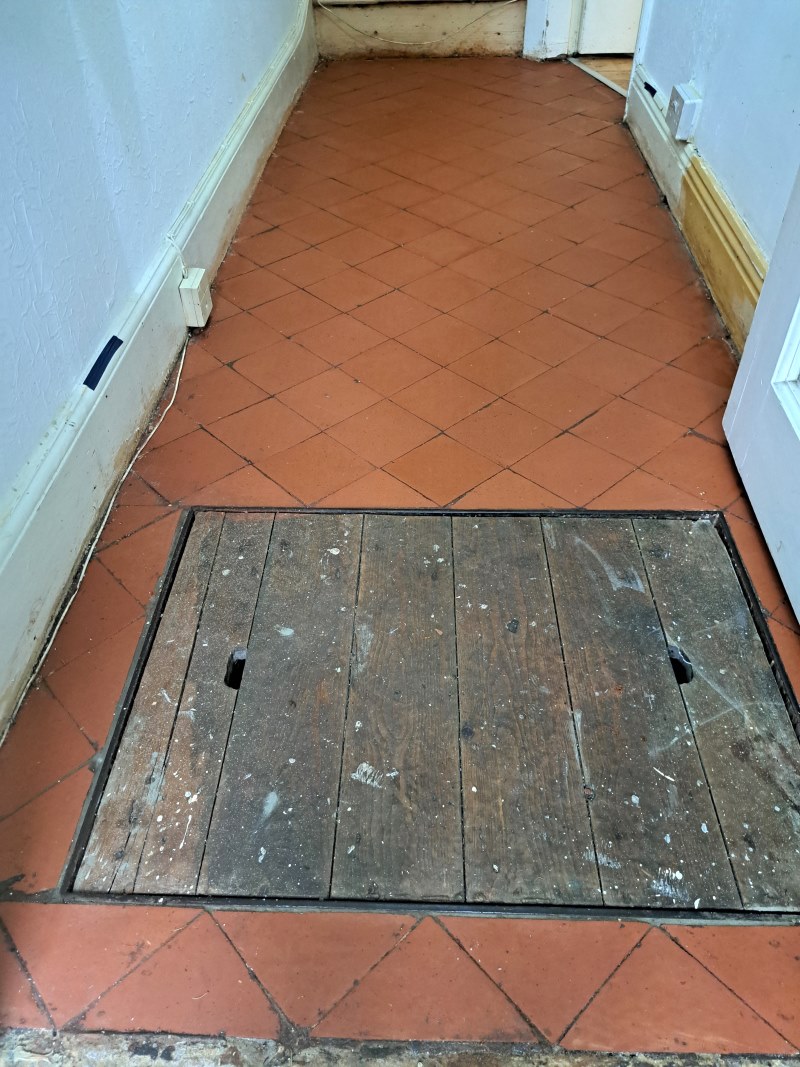
Quarry Tiled Hallway After Restoration Bournville Quarry Tiled Hallway After Restoration Bournville

This sealer will ensure that dirt remains on the surface where is can be easily cleaned away. Another benefit of the sealer is it further improves the colour of the tiles and being fully breathable it will allow moisture still in the floor to rise through and evaporate at the surface.
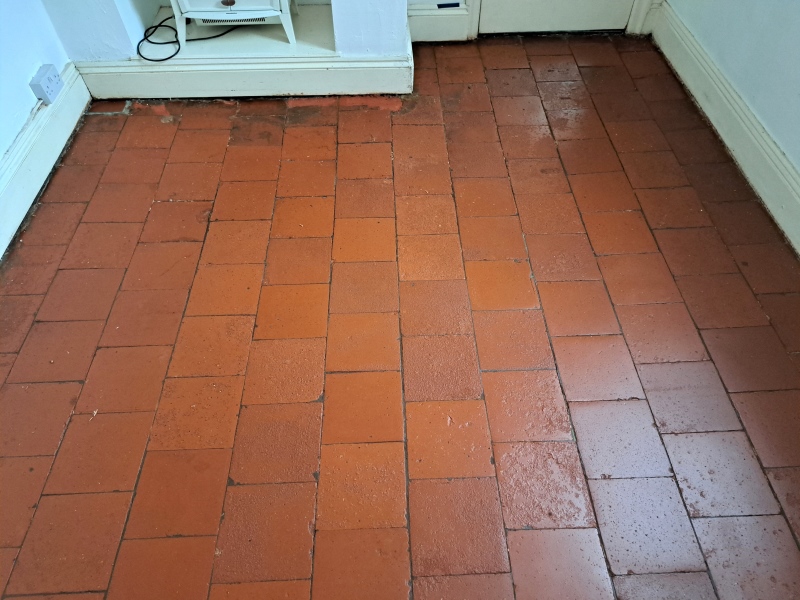
Quarry Tiled Floor After Restoration Bournville

Once complete all the tiled floors looked so much cleaner and colourful, additionally the new sealer gave all the Quarry tiles a consistent appearance throughout the property.

My customer was very happy with the results and before leaving I took time to discuss aftercare cleaning and left them with a complimentary bottle of Tile Doctor pH neutral Tile Cleaner. This is a mild but effective tile cleaning product that won’t impact the sealer which can be the issue with the stronger products you find in supermarkets.
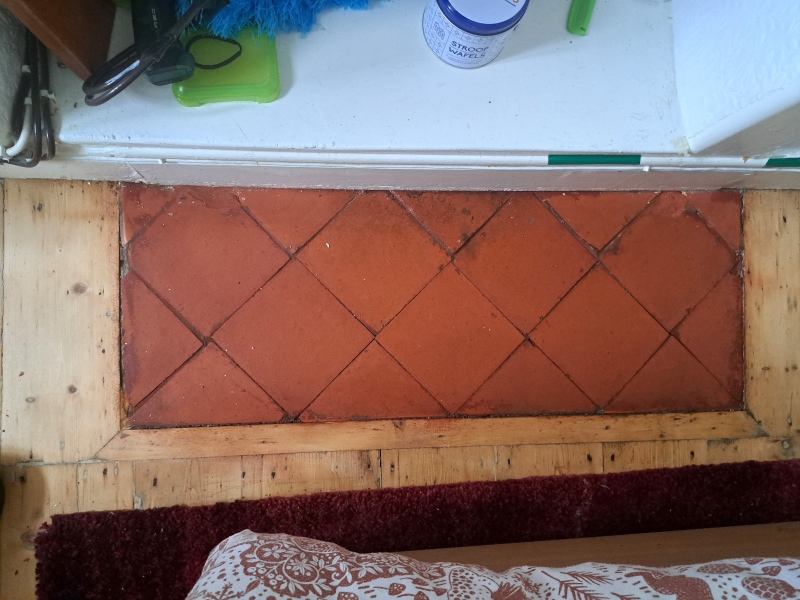
Quarry Tiled Hearth After Restoration Bournville


Professional Restoration of Quarry Tiled Floors in Birmingham

Multiple Neglected Quarry Tiled Floors Restored in Bournville Read More »

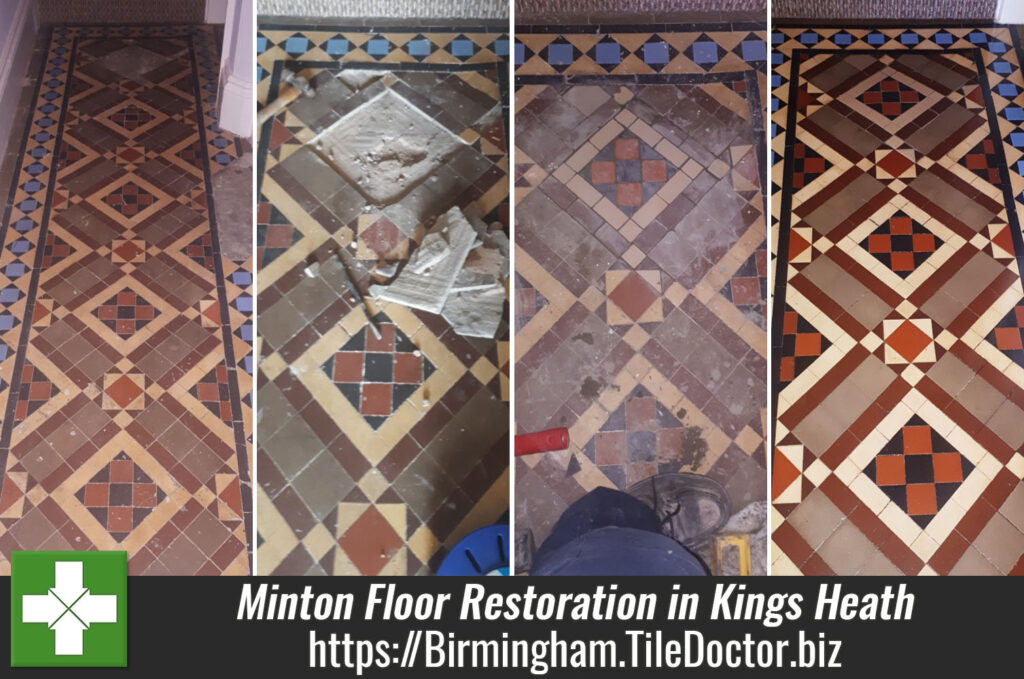
Minton Hallway Floor Before and After Restoration Kings Heath

Full Restoration of a Minton Tiled Victorian Hallway Floor in Kings Heath

Details below of the full restoration of a Victorian Minton tiled hallway floor that I restored earlier this year in the South Birmingham suburb of Kings Heath. The owner had recently purchased the property and discovered a Victorian tiled floor underneath an old carpet in the hallway.

Victorian Tiled Hallway Before Restoration Kings Heath Victorian Tiled Hallway Before Restoration Kings Heath

The floor was in a very poor state with areas where tiles were missing and had been backfilled with a cement levelling compound. The adjacent vestibule also had a large area of tiling missing. My client was delighted when they had found some of the missing original tiles and now wanted to investigate having the floor returned to its former glory.

Victorian Tiled Hallway Before Restoration Kings Heath

I went along to quote and give a demonstration of the restoration process and provide an indication of the expected results. The test area responded well to the treatment and they were happy with my quote to repair and renovate the floor, so were booked in to restore the whole floor and I set about sourcing matching replacement tiles.

Victorian Tiled Hallway Before Restoration Kings Heath

Repairing a Victorian Tiled Hallway Floor

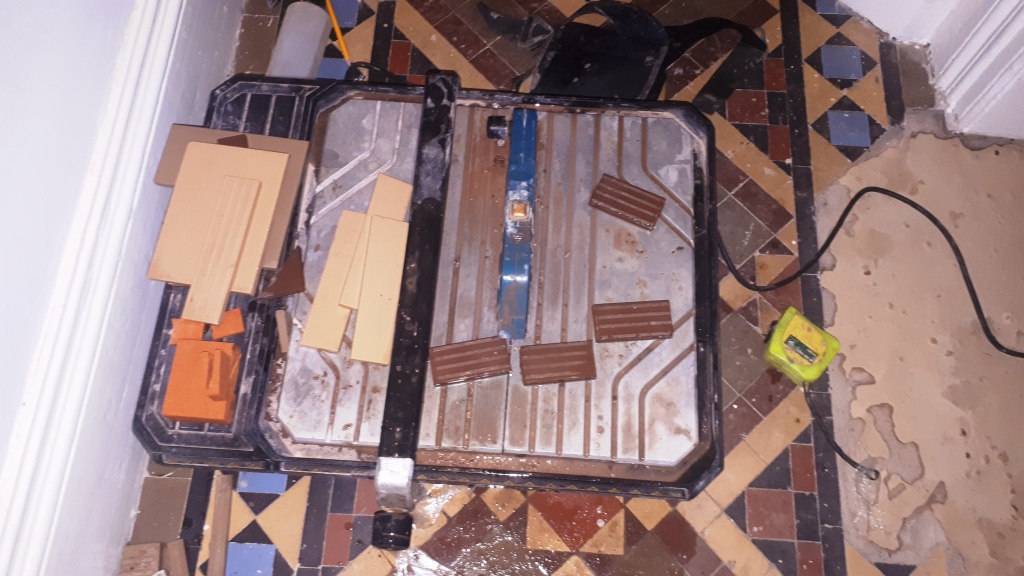
The first two days were spent carefully removing the leveller, cleaning up the exposed subfloor then cutting and fitting replacement tiles. One of the areas that needed extra work was a doorway which required a sub-floor installing before being able to tile with a matching pattern.

Victorian Tiled Hallway During Restoration Kings Heath

With the main hallway tiling completed I started on the tiling in the adjacent vestibule. I had been given a couple of bags of original tiles to sort out by the owner and fortunately most of them were in good condition, so I was able to repair the vestibule with approximately 90% original tiles. The rest were made up of reproduction tiles that I had managed to source. Additionally, the floor had numerous loose tiles which needed resetting and finishing with replacements. Due to so many of the tiles being original the appearance between the newly replaced area did not look too much different however I was confident the following deep clean and seal would blend them in well.

Victorian Tiled Hallway During Restoration Kings Heath

Deep Cleaning a Victorian Tiled Hallway Floor

With the tiling now repaired my next focus was the cleaning which I started on day three with an application of neat Tile Doctor Pro-Clean to help loosen the carpet adhesive and paint splashes that were staining the floor.

The Pro-Clean was mopped onto the floor and then worked in with a 200-grit diamond pad fitted to a weighted rotary buffing machine. The extra weight, cleaning agent and coarse pad gets into the pores of the tile releasing years of ingrained dirt and removing old sealers and coatings. The floor was then rinsed with water and the waste extracted with a wet vacuum.

Victorian Tiled Hallway During Restoration Kings Heath Victorian Tiled Hallway During Restoration Kings Heath

The next step was to give the floor an acid rinse using another Tile Doctor product called Grout Clean-up which is designed to remove grout smears and mineral salts that will have been trapped into the pores of the tile after years of being covered in carpet. The grout clean-up was worked into the tiles using a 400-grit burnishing pad to refine the tile surface and close up the pores. The floor was rinsed and extracted again and left to dry out for two nights.

Sealing a Victorian Tiled Hallway Floor

I returned a few days later and after testing the floor was dry set about applying a sealer. For this floor I chose to apply six coats of Tile Doctor Seal and Go which gives a lovely sheen finish and really brought out the character in the beautiful tiles. It’s also water based so it doesn’t leave a smell as it dries.

Victorian Tiled Hallway After Restoration Kings Heath Victorian Tiled Hallway After Restoration Kings Heath

By the time I had finished the floor was looking transformed and the client was delighted, so much so they left this fantastic review:

Kieron was fantastic. He brought our Minton flooring back to life and kept us informed every step of the way. He really knew what he was talking about and has done a fantastic job. Not to mention he was a really really lovely guy and great value for the incredible workmanship he offers.”

I left the customer with a bottle of Tile Doctor Neutral Tile Cleaner to help maintain the tiles appearance. It is important to use a neutral pH cleaner when maintaining sealed floors as stronger tile cleaning products that you find in supermarkets are too strong and will prematurely strip the protective sealer off a floor.

Victorian Tiled Hallway After Restoration Kings Heath


Professional Restoration of a Victorian Tiled Hallway in West Midlands

Full Restoration of a Minton Tiled Victorian Hallway Floor in Kings Heath Read More »

Victorian Tiled Floor Before After Restoration Bourneville

Victorian Period Hallway Floor Restored in Bourneville

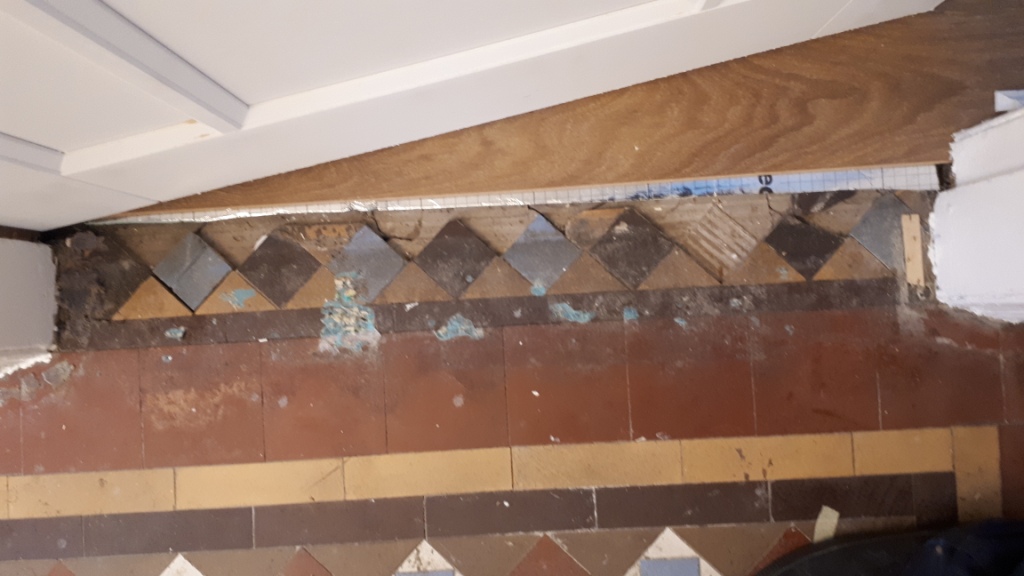
This client had recently discovered a Victorian tiled floor hidden underneath hallway carpet at their property in the Birmingham suburb of Bournville. It didn’t look in great condition as some areas were missing and staining from carpet adhesive, but it was a beautiful patterned floor tiled potentially with Minton tiles and they were really keen to find out if it could be restored to its’ former glory.

The rest of the property in Bourneville had retained its’ original features so the floor would be the icing on the cake.

Victorian Tiled Floor Before Restoration Bourneville

I went along to survey the floor, provide a quote and perform a small cleaning demonstration so I they could get an idea of the results they could expect. The damaged areas were repairable and once I had completed the test clean, we were confident the floor could be restored. They were happy to proceed with my quote and the job was booked in.

Victorian Tiled Floor Before Restoration Bourneville Victorian Tiled Floor Before Restoration Bourneville

Bourneville is the home of the chocolate makers Cadbury, so many people will have visited and been aware of the area. Many of the houses were built for the workers at the Cadbury factory.

Repairing a Victorian Tiled Hallway Floor

On the first day I started on relaying the three internal door thresholds with some existing tiles and matching replacements that I had managed to source online. We are usually able to source reclaimed tiles and reproduction ones, so repairs are not usually a problem. It took some time to clean out the old adhesive, cut the replacement tiles to size where required and then then fix in place with fresh adhesive.

Victorian Tiled Door Threshold Before Restoration Bourneville Victorian Tiled Door Threshold Before Restoration Bourneville Victorian Tiled Door Threshold Before Restoration Bourneville

The next job was to replace some broken ones along the edges and some in the main part of the floor which had been drilled in to. These can be tricky to do as they can easily break adjoining tiles. When this was done the tiles were grouted and the other loose ones reset. It’s meticulous work and the tile adhesive needs time to set before the next stage which would be giving the entire floor a deep clean.

Victorian Tiled Floor Before Restoration Bourneville

Deep Cleaning a Victorian Tiled Hallway Floor

The following day I focused on deep cleaning the tiles starting with the removal of the strong adhesive that had secured the carpet gripper. This had to be removed by applying a neat Tile Doctor Pro-Clean and leaving it to dwell for ten minutes. The Pro-Clean helped loosen the glue which was then carefully scraped off.

The floor was then mopped with a strong dilution of Pro-Clean before running over the tiles with a 200-grit diamond pad fitted to a rotary machine. This combination gets into the pores of the tile, releasing the dirt and renovating the surface. The resultant slurry was then rinsed off with water and extracted using a wet vacuum.

Next, the floor was given an acid rinse using Tile Doctor Grout Clean-Up worked in with a 400-grit burnishing pad to further clean up the tiles and close-up the pores. The floor was rinsed and extracted again and allowed to dry for two nights.

Sealing a Victorian Tiled Hallway Floor

On my return I tested the floor was dry with the damp meter and satisfied myself that the floor was dry and ready to accept a sealer which would enhance its appearance and protect it going forward.

My sealer of choice was Tile Doctor Seal and Go Extra which adds a nice subtle sheen to the floor and being breathable will cope with any potential moisture rising through the tiles. This is an important consideration on old floors like this where no damp proof membrane will have been fitted.

Victorian Tiled Floor After Restoration Bourneville Victorian Tiled Floor After Restoration Bourneville

By the time I had finished the floor was transformed and had become the main focal point of the house. My clients were very pleased with the new entrance to their home and before leaving we discussed after care for which I left them with a complementary bottle of Neutral Tile Cleaner.

Victorian Tiled Door Threshold After Restoration Bourneville


Professional Restoration of a Victorian Tiled Hallway in Birmingham

Victorian Period Hallway Floor Restored in Bourneville Read More »

Slate Tiled Floor Before and After Sealing Moseley

Dull Slate Tiled Floor Stripped and Re-Sealed in Moseley

A client contacted me regarding their slate tiled floor which had only been down a few years and was now looking dull and uninviting. The slate tiles were laid in a herringbone pattern and Interestingly they had only been cleaned and sealed about a year ago by another company, but it has soon started to look dull again. Naturally my client was disappointed with the result, especially considering how new the floor was.

Slate Floor Before Cleaning Moseley

The property was in the Birmingham suburb of Moseley and as per usual I paid them a visit to survey the floor and conduct a test clean. From what I could see the sealer the previous company had used was already failing and wearing off, this left the stone vulnerable allowing dirt to become ingrained in the stone. We discussed the overall procedure and I completed a test clean on part of the floor which went well so the customer was happy to proceed. Whilst I was there, we also discussed the effects of different sealers I would recommend for the tiles so they could select one that would give them the look they wanted.

Slate Floor Before Cleaning Moseley Slate Floor Before Cleaning Moseley

Cleaning a Slate Tiled Kitchen Floor

On the first day I applied a strong solution of Tile Doctor Pro-Clean combined with Tile Doctor Remove and Go, this was left to dwell on the slate while I cleaned up the grout with a stiff grout brush. I used this combination of products to ensure I stripped any coatings that may have been applied to the floor by the previous company and the original installer. With the grout scrubbed I turned my attention to the Slate tiles by scrubbing them with a black pad fitted to a weighted rotary buffer machine. The floor was then rinsed thoroughly, and the now soiled cleaning solution extracted with a wet vacuum.

Slate Floor During Cleaning Moseley

The kitchen area was quite large, so I did the clearing in three section inspecting each section afterwards before moving onto the next. There were some areas where the existing sealer was proving stubborn to remove which were re-treated until clean. I discussed this with the customer who explained that the previous company had left a tin of sealer and advised them that they should clean the floor and then apply more sealer. This meant every time they did, they were adding another coat of seal and if the cleaning was not effective it would result in trapping dirt under the sealer! After spending most of the day cleaning, it was agreed to let the floor dry out and see how it looked next day.

When I returned on the second day, I could see there were still traces of sealer on some areas of stone and grout, so I decided to clean the floor again with more Pro-Clean but this time working in in with an abrasive 400-grit burnishing pad. This did the trick on the slate, but the grout needed a handheld diamond block to remove the seal. The whole floor was then rinsed and allowed to dry.

Sealing a Slate Tiled Kitchen Floor

Although previously we had discussed the different options for sealing the client wasn’t sure which one to choose. To help them decide I dried some of the tiles with a heat gun and applied different sealers to they could see the different between the matt and sheen finishes. The client decided on Tile Doctor Seal & Go Extra which helps bring the colour out in the tiles, it’s also breathable and has a nice sheen to it but slightly less so than Tile Doctor Seal & Go. I applied four coats as soon as the floor had dried.

Slate Floor After Sealing Moseley

I left the client with a bottle of Tile Doctor Neutral Tile Cleaner to help maintain the tiles appearance. The client was very happy with the results, thanked me for my hard work and commented that the floor looked better than the day it went down.

Slate Floor After Sealing Moseley


Professional Restoration of a Slate Tiled Floor in Birmingham

Dull Slate Tiled Floor Stripped and Re-Sealed in Moseley Read More »

Original Quarry Tiled Hallway Restored in Rednal

Original Quarry Tiled Hallway Restored in Rednal

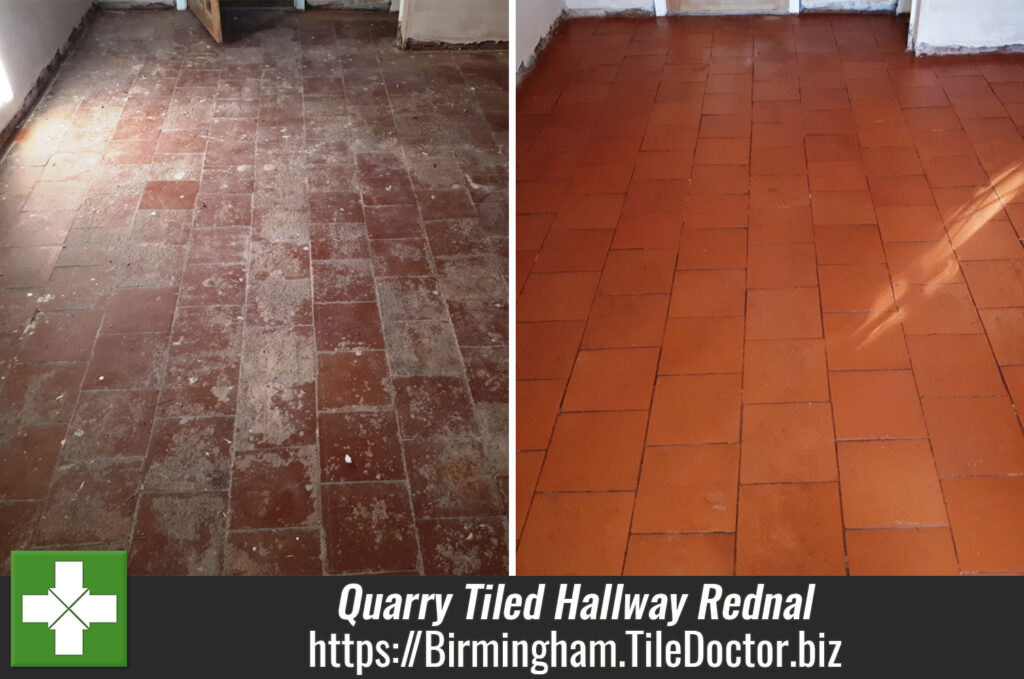
I was recently contacted by a home owner who had recently bought a property in Rednal which is a residential suburb on the south western edge of Birmingham near Bromsgrove. They were updating the flooring and discovered a quarry tiled floor under their living room carpet. The Quarry tiles were most likely original dating back 113 years and the owner was keen to have such an original feature restored.

Quarry Tiled Floor Before Restoration Rednal
The Quarry tiles were well worn in areas and it looked as though a previous owner had levelled the floor using a cement screed to try and fill in any worn areas. Unfortunately, this had left the tiles with a rough surface and were very dirty as the photos show.

Quarry Tiled Floor Before Restoration Rednal

Cleaning Original Quarry Tiles

My first task was to remove any loose dirt and debris with a wet dry vacuum. Once done I then applied a strong dilution of Tile Doctor Pro-Clean to give the tiles an initial clean to remove dirt from the tiles. The solution was left to soak into the tile for around ten minutes and then worked into the floor using a rotary machine fitted with a black scrubbing pad.

Quarry Tiled Floor During Restoration Rednal
This process highlighted the roughness of the tiles from the cement as the pad was being torn by it. I decided that the best way to remove the cement was to scrape it away aided with a steamer. This meant a few hours on my hands and knees scraping away which was hard work but needs must!

Quarry Tiled Floor During Restoration Rednal
When this was completed I used hand held diamond blocks to remove paint marks and adhesive from where the skirting board had been. I then cleaned the floor again with more Pro-Clean and a new black pad, I also cleaned the grout lines with a stiff grout brush. The floor was then thoroughly rinsed off with water to remove any dirt and solutions and this was then extracted using a wet vacuum.

With the floor now clean I could see there were signs of efflorescence markings on the floor which is where salts are carried up through the floor through evaporation. These old floors don’t have a damp proof membrane in place to prevent damp issues so to neutralise the salts I applied Tile Doctor Acid Gel to the floor. This was left in place for a short time before rinsing the floor again. The floor was then allowed to dry out for a couple of days.

Sealing Original Quarry Tiles

Upon my return I checked the floor for damp with a meter which gave satisfactory readings. The floor was then sealed with two coats of Tile Doctor Colour Grow which is an impregnating colour enhancing sealer that really brought out the red colour of the quarry tiles.

Quarry Tiled Floor After Restoration Rednal
One the sealer had dried the floor was then buffed off with a white pad to remove any excess. As you can see the floor was transformed. I left the customer with a bottle of neutral tile cleaner to help maintain the floor.”

Quarry Tiled Floor After Restoration Rednal
 

Restoration of an Original Quarry Tiled Floor in the West Midlands

Original Quarry Tiled Hallway Restored in Rednal Read More »

=================================

Birmingham Tile Doctor

================================= Read More »

Scroll to Top