Stone Oil

Victorian Tiled Floor Restoration Walsall

Repair and Restoration of Victorian Tiled Hallway in Walsall

This customer from Walsall contacted Tile Doctor regarding their Victorian tiled hallway which was in a very poor state. I was sent some photographs which made it clear the floor was seriously neglected with loose tiles and all sorts of contaminates. To understand all the issues before quoting I made an appointment to pop over and survey the floor in detail.

Victorian Tiled Floor Before Restoration Walsall

Whilst at the property I took measurements and made notes of the tiling work that would be needed which centred around the door threshold. I’ve worked on floors as bad as this before so wasn’t overly concerned and worked out a detailed plan for the restoration which was explained to the customer. Later that day I priced up the work and products needed and emailed a quote for job across to the customer who gave the go ahead.

Victorian Tiled Floor Before Restoration Walsall Victorian Tiled Floor Before Restoration Walsall

Repairing and Cleaning a Victorian Tiled Hallway Floor

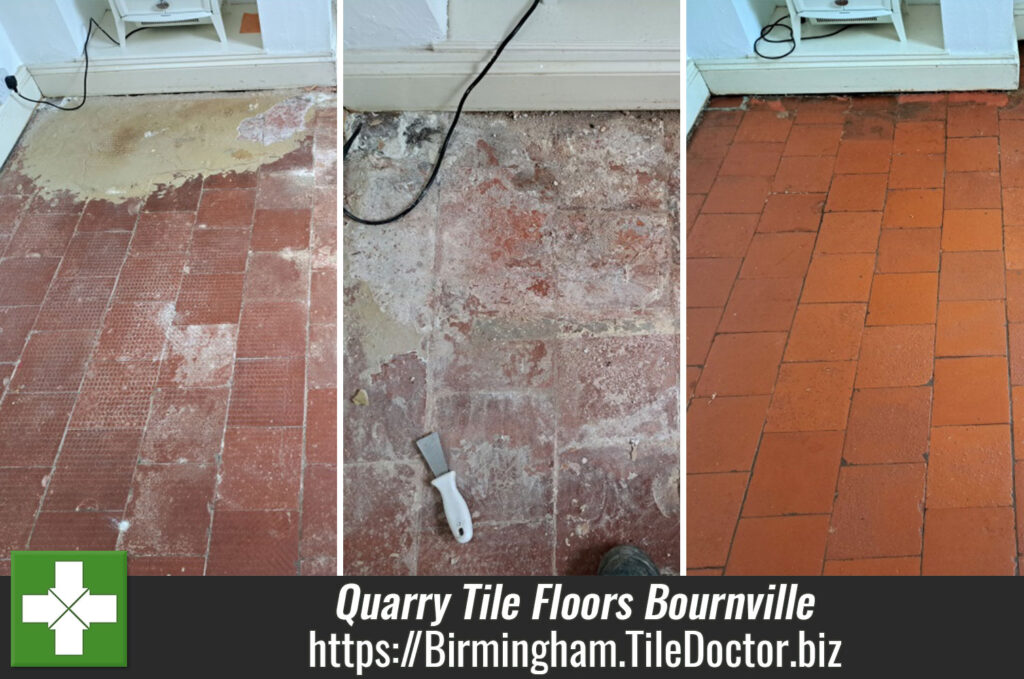
Before starting the cleaning work, it made sense to address the tiling issues first so work started by removing the loose tiles along the doorway threshold. The exposed foundations were cleaned up along with the original tiles and then re-laid together with matching replacements where needed that had to be cut to size. Fortunately, the repairs were limited to this one area so I was able to move onto cleaning the rest of the floor.

I decided to start with an initial clean using Silicon Carbide pads applied to the tiles with a strong dilution of Tile Doctor Remove and Go which is a coatings remover designed for use on tile and stone. There was a lot of stubborn staining to deal including what I suspect was carpet adhesive, screed, bitumen and paint.

I used the pads then rinsed the floor with water and extracted the soiling with a wet vacuum. The initial clean had made a difference but it was clear I would need to get a steamer on staining to soften it and scrape it away. Fortunately, it wasn’t a massive area but it still took a couple of hours to do. On completion of this I went over the floor again with a carbide pad and more Remove and Go.

Victorian Tiled Floor During Restoration Walsall

Last step in the cleaning process was to treat the floor to an acid rinse using Tile Doctor Acid Gel worked in with a 400-grit diamond pad. This treatment removes old cement residues, counters efflorescent salts which are a common issue with these old floors and neutralises the pH level of the floor after the use of alkaline cleaning products. The floor was given another rinse with water and then dried as much as possible with the wet vacuum.

After rinsing I used air movers and a heater to help dry the floor off and before leaving for the night a coat of Tile Doctor Stone Oil was applied to boost the colours of the tiles.

Victorian Tiled Floor During Sealing Walsall

Sealing a Victorian Tiled Hallway Floor

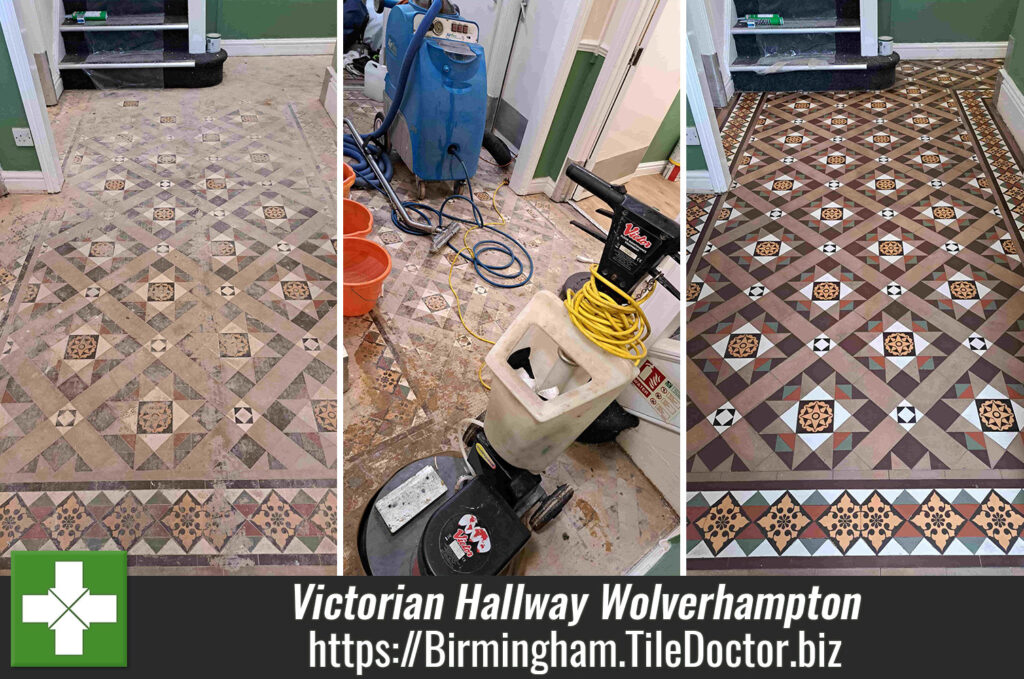
Returning the next day work started by inspecting the floor and checking it had dried sufficiently. Then I went over the floor with a floor buffer fitted with a 1500 and then 3500-grit diamond pad. I did this to help tighten the pores in the tiles after the aggressive cleaning it had experienced the day before. This also adds a slight sheen polish to the clay tiles.

To seal the floor an initial coat of Tile Doctor X-Tra Seal was applied followed by a coat of Tile Doctor Colour Grow. These sealers offer different advantages and being impregnators, they are very hard wearing, they also allow for vapour transmission so ideal for an old floor like this one that doesn’t have a damp proof membrane. After drying I buffed off with a White pad to remove an excess sealer and bring up the finish on the tiles.

Victorian Tiled Floor After Restoration Walsall

The old Victorian floor tiles were unrecognisable after the work and completely transformed the hallway into an appealing and welcoming space. Needless to say, my customer was delighted with the result.

Victorian Tiled Floor After Restoration Walsall Victorian Tiled Floor After Restoration Walsall

Before leaving I left the customer with a bottle of Tile Doctor Neutral Tile Cleaner to help maintain the floor going forward. Its important to use a pH neutral tile cleaner on a sealed floor as many of the product you find in supermarkets are simply too strong and will erode the sealer.


Professional Restoration of a Victorian Tiled Hallway in Birmingham

Repair and Restoration of Victorian Tiled Hallway in Walsall Read More »

Quarry Tiled Floor Restoration Bournville

Multiple Neglected Quarry Tiled Floors Restored in Bournville

A customer had recently moved into a property in Bournville and discovered an original Quarry tiled floor in the living room, hallway and a couple of quirky tiled areas upstairs. After searching on the internet for some inspiration, they came across my previous work and got in touch. Period floors like these are very popular and so they were keen to have the Quarry tiles restored.

Quarry Tiled Hallway Before Restoration Bournville

I went over the property to survey the floor and made notes of all the floors and problems including the removal of self-levelling screed in the living room. This is often used to level tiled floors prior to the installation of another covering such as Vinyl or Carpet. It can be difficult to remove but it can be done. Another issue that would need to be dealt with was carpet glue and paint stains which I found in the hallway.

Quarry Tiled Floor Before Restoration Bournville

I worked out a detailed plan for the restoration work and was able to use this to create a quote for the work. Keen to have the floors restored my quote was accepted and a date set for the work to start.

Quarry Tiled Hearth Before Restoration Bournville

Cleaning a Quarry Tiled Living Room Floor

The first day was spent removing an area of levelling screed from the living room along with a couple of repairs to the tiles. This literally has to be scrapped off the tiles by hand to remove the bulk of the screed. The whole floor was then cleaned with a strong dilution of Tile Doctor Remove & Go scrubbed in with a 120-grit carbide pad fitted to a weighted buffer machine. The resultant slurry was then extracted with a wet and dry vacuum.

Quarry Tiled Floor Before Restoration Bournville

The next step was to give the floor an acid rinse using Tile Doctor Grout Clean-up which is ideal for breaking down cement residues. It was let to soak into the floor for ten minutes before being scrubbed. For this the coarse 120-grit pad was switched for a finer 240-grit carbide pad. The floor was rinsed with water and extracted again to remove the slurry.

Quarry Tiled Floor During Restoration Bournville

After inspecting the floor, I was pleased to see that marks imprinted onto the tiles by the previous floor covering had been removed and the tiles were looking so much cleaner. Happy with my work the tiles were left to dry off overnight with the aid of a couple of air movers.

The next day I tackled the Quarry tiled hallway which was stained with carpet glue. The started with a steamer to loosen up year’s old adhesive and bitumen along with a scraper to remove dried paint. The hallway tiles along with a couple of tiled hearths upstairs were then cleaned using the same process as the living room.

After an hour or so of drying the tiles, I applied a coat of Tile Doctor Stone Oil to all the floors and left them to dry for twenty minutes before towelling off the excess. The tiles were then left to dry off completely overnight. Stone oil is the first step in the sealing process and adds colour, texture, and generally improves the condition of the Quarry tiles after years of neglect.

Sealing a Quarry Tiled Living Room Floor

On the last day I applied a coat of Tile Doctor X-Tra Seal to all the tiles to seal them. This sealer is an impregnator that soaks into the Quarry tile, occupying its pores and thereby preventing dirt from residing there. The tiles were then buffed with a White pad fitted to the rotary machine to remove excess sealer and bring up their appearance.

Quarry Tiled Hallway After Restoration Bournville Quarry Tiled Hallway After Restoration Bournville

This sealer will ensure that dirt remains on the surface where is can be easily cleaned away. Another benefit of the sealer is it further improves the colour of the tiles and being fully breathable it will allow moisture still in the floor to rise through and evaporate at the surface.

Quarry Tiled Floor After Restoration Bournville

Once complete all the tiled floors looked so much cleaner and colourful, additionally the new sealer gave all the Quarry tiles a consistent appearance throughout the property.

My customer was very happy with the results and before leaving I took time to discuss aftercare cleaning and left them with a complimentary bottle of Tile Doctor pH neutral Tile Cleaner. This is a mild but effective tile cleaning product that won’t impact the sealer which can be the issue with the stronger products you find in supermarkets.

Quarry Tiled Hearth After Restoration Bournville


Professional Restoration of Quarry Tiled Floors in Birmingham

Multiple Neglected Quarry Tiled Floors Restored in Bournville Read More »

Victorian Hallway Floor Renovation Wolverhampton

Renovation of Victorian Hallway Floor Tiles in Wolverhampton

This large area of Victorian floor lay hidden away for several years under carpet on a former care home in Wolverhampton. The building was being renovated, and the client wanted to bring the floor back to life as it was in a poor state.

Victorian Hallway Floor Before Cleaning Wolverhampton

I went along to survey the floor and conduct a test clean, which worked out very well and impressed the client. Happy with the potential result I was asked to do the work and the job was booked in.

Victorian Hallway Floor Before Cleaning Wolverhampton

Cleaning and Repairing a Victorian Tiled Hallway Floor

On the first day I repaired the threshold tiles under four doorways, which had either been replaced with concrete or had tiles missing. I had to clean them up first to see exactly what was missing. After completing those I regrouted the areas that needed to be.

Victorian Hallway Floor Before Cleaning Wolverhampton

The next two days were spent deep cleaning the tiles which was covered in a very thick carpet adhesive, which was difficult to remove, especially in the hallway area. I gave the floor a coat of Tile Doctor Remove & Go and let that soak in to soften the glue so it could be removed more easily. The glue was then scraped off the affected areas with the help of a steamer.

Victorian Hallway Floor During Cleaning Wolverhampton Victorian Hallway Floor During Cleaning Wolverhampton

Once the majority of adhesive had been removed, I applied more Tile Doctor Remove & Go combined with Tile Doctor Oxy-Gel and let it dwell on the floor for ten more minutes. Then a 120-grit carbide silicone brush pad fitted to a weighted rotary machine was run over the tiles to remove the grime and dirt. The resultant slurry was then rinsed off with an Airflex machine which applies and removes hot water under pressure to give the floor a thorough rinse.

Victorian Hallway Floor During Cleaning Wolverhampton

Next, the floor was treated to an acid rinse using with Tile Doctor Grout Clean-Up, this counters the formation of efflorescence which is a common problem with old floors that don’t have the benefit of a damp proof membrane. This product also removes old grout haze and other mineral contaminates which detract from the overall appearance of the tiles. This process was applied in a few sections at a time due to its size.

I set up a couple of air movers to help get the floor dry and to further improve the appearance of the tiles I went over the floor with a very fine 3000-grit pad. This pad is fitted to the rotary floor machine and applied dry with only a little water sprayed onto the tiles.

Before finishing for the day, I gave the floor a single coat of Tile Doctor Stone Oil and clothed off any excess. The floor was then left to dry off overnight with the help of the air movers.

Victorian Hallway Floor After Renovation Wolverhampton

Sealing a Victorian Tiled Hallway Floor

The next day I returned to seal the Victorian tiling with Tile Doctor X-Tra Seal buffing off the excess with a white pad. This product is fully breathable so will allow for moisture to rise through the tile from the foundation and not become trapped which could lead to damp problems later. Two coats were applied to add long lasting protection and a beautiful finish.

Victorian Hallway Floor After Renovation Wolverhampton

I think you will agree the pictures really show off the improvement to the floor. Certainly, my client was very happy with the work we carried out. For aftercare I left the client with a bottle of Tile Doctor pH Neutral Tile Cleaner to help maintain the floor going forward.

Victorian Hallway Floor After Renovation Wolverhampton


Professional Restoration of a Victorian Tiled Hallway in Birmingham

Renovation of Victorian Hallway Floor Tiles in Wolverhampton Read More »

Efflorescence Stained Quarry Tiled Floor After Renovation Great Barr

Efflorescence Stained Quarry Tiled Floor Renovated in Great Barr

A client from Great Barr in North Birmingham discovered a leak in a water pipe, which had been running in to the Quarry tiled living room for some time. The leak was repaired but had resulted in a lot of water soaking into the quarry tiles. This led to a significant amount of efflorescence appearing as the floor dried out leaving them in a poor condition.

Efflorescence Stained Quarry Tiled Floor Before Cleaning Great Barr

I paid a visit to the property to see the condition of the tiles for myself and conducted a few tests to work out the best method to remove the efflorescence and restore the appearance of the quarry tiles. From this I worked out a quote which was submitted to my client’s insurance company.

Efflorescence Stained Quarry Tiled Floor Before Cleaning Great Barr Efflorescence Stained Quarry Tiled Floor Before Cleaning Great Barr

The job was then put on hold for a couple of months until the client’s insurance company agreed the claim. This as it turns out was not such a bad thing, as the floor needed time to dry out completely (aided with dehumidifiers) before work began.

Cleaning a Quarry Tiled Living Room Floor

On the first day I started by taking moisture readings from the floor, which were quite low, and confirmed the floor had indeed dried out. Next, I gave the floor a general clean using Tile Doctor Remove & Go, I used a strong dilution and sprayed it onto the floor allowing it to soak in for ten minutes. Then I went around the edges and corners with a piece of black scrubbing pad to get the awkward areas clean first. I then used a 120-grit carbide silicone pad fitted to a rotary machine to loosen up the dirt.

The floor was then rinsed with an air flex pro machine which applies water at high pressure to the floor and then simultaneously extracts the dislodged dirt with a built-in wet vacuum.

To deal with the efflorescence I applied Tile Doctor Grout Clean-up and worked it in with a 240-grit carbide pad as before. This product is acidic and is perfect for dissolving the alkaline salts that form efflorescence. The solution was then rinsed off and extracted as before, and I set up a couple of air movers to aid drying the floor, for a couple of hours.

Sealing a Quarry Tiled Living Room Floor

Before leaving for the day I applied a coat of Tile Doctor Stone Oil and let that soak in for twenty minutes before towelling off the excess, the floor was then let to dry off fully overnight, again I left a couple of air movers in place to assist with the drying.

The next day I applied two coats of Tile Doctor X-Tra Seal, leaving an hour between coats to dry. The Stone Oil and X-Tra Seal will give great protection going forward and give the quarry tiles a slight sheen which really lifts the appearance of the tiles. Another benefit of the sealer is it improves the colour of the tiles and being fully breathable it will allow moisture still in the floor to rise through and evaporate at the surface.

Efflorescence Stained Quarry Tiled Floor After Renovation Great Barr Efflorescence Stained Quarry Tiled Floor After Renovation Great Barr

Finally, I buffed the Quarry tiles with a white pad to bring up their appearance even further. My client was very happy with what was a complete transformation to the floor and left the following review.

Very helpful insurance repair. Visited whenever necessary to give advice and helped with ongoing maintenance suggestions.
Before leaving took time to discuss aftercare cleaning for which I left them with a complimentary bottle of Tile Doctor pH Neutral Tile Cleaner.

Efflorescence Stained Quarry Tiled Floor After Renovation Great Barr

Professional Restoration of a Quarry Tiled Living Room in Birmingham

Efflorescence Stained Quarry Tiled Floor Renovated in Great Barr Read More »

Quarry Tiled Floor Restoration Stourbridge

Quarry Tiled Floor Fully Rebuilt and Restored in Stourbridge

This customer from the historic West Midland’s town of Stourbridge contacted me about their living room floor which was laid with Quarry tiles; however, one area which I suspect may have originally been a fireplace had been tiled with pale ceramic Pink tiles. These would need to be removed and replaced with matching quarry tiles if the floor was to have a consistent appearance.

Quarry Tiled Floor Before Restoration Stourbridge

Whilst surveying the floor I conducted a test clean on a section of Quarry tiles which came up well and I discussed sourcing matching replacements with the owner. I knew of a reclamation yard local close to the customer that I’ve previously used, he suggested getting his own replacements from there which I was happy with and the work was booked in.

Repairing and Cleaning a Quarry Tiled Floor

On arrival I looked at the reclaimed tiles the owner had sourced and noticed they were all approx. 5mm larger than the original tiles. So, before doing anything else I had to cut them all to size with my wet tile cutter. This is messy work with quarry tiles as they create an orange slurry when cut, if you’re not careful you’ll end up looking like an Oompa Loompa after cutting them!

Quarry Tiled Floor During Restoration Stourbridge Quarry Tiled Floor During Restoration Stourbridge

Next I had to remove the Pink Ceramic tiles and dig into the area underneath to ensure the thicker Quarry tiles would be level with the surface of the existing floor. Once the debris had been cleared, I was then able to apply a self-levelling compound to bring the sub-floor up to the required level. The levelling compound was left to dry off overnight and I returned the next day to fit the cut tiles and grout them in after the adhesive had dried.

Quarry Tiled Floor During Restoration Stourbridge Quarry Tiled Floor During Restoration Stourbridge

The next day with the replacement tiles set I was able to clean the whole floor with Tile Doctor Remove & Go which was allowed to soak in for a while and then topped up so not to dry out. I then used a silicon carbide brush fitted to a weighted rotary machine to scrub the floor and loosen all the dirt. Next job was to run a stiff brush along the grout lines to get them clean as well, before rinsing and extracting the dirt with a portable Airflex Pro wet vacuum. I use a low psi so as not to apply too much water.

The floor was then towelled off before starting the last part of the cleaning process which involves treating the tiles with an acid-rinse using a dilution of Tile Doctor Grout Clean-Up. This is an acidic product that can remove mineral staining and will also counter any alkaline salt deposits in the pores of the tile that could surface as the floor dries.

The floor was then rinsed and towel dried as before but this time I left a couple of floor fans in place to assist with the drying whilst I packed away the machinery.

Sealing a Quarry Tiled Floor

After an hour I applied a single coat of Tile Doctor Stone Oil, I find that this helps bring the colour of the Quary tile, aids drying and minimises any efflorescence salts coming through overnight.

Quarry Tiled Floor After Restoration Stourbridge

I returned next day to fully seal the floor. The floor was old with no damp proof membrane installed and had shown signs of dampness In the past. Because of this I recommended using Tile Doctor X-Tra seal to seal the floor which is fully breathable sealer and will cope well with any damp issues. Additionally, this applied with the stone oil adds a nice slight sheen to the floor which really lifts its appearance.

Quarry Tiled Floor After Restoration Stourbridge

The deep clean and new sealer really helped blend in the replacement tiles with the original and once complete my customer was very happy with the transformation. Before leaving we discussed aftercare and I left them a complimentary bottle of Neutral Tile Cleaner to maintain the tiles going forward. This is a pH neutral product that is safe to use on sealed surfaces and won’t prematurely erode the sealer like many stronger tile cleaners you will find in supermarkets.


Professional Restoration of a Quarry Tiled Floor in Birmingham

Quarry Tiled Floor Fully Rebuilt and Restored in Stourbridge Read More »

Edwardian Tiled Hallway Floor Restoration Bearwood

Laminate Covered Edwardian Hallway Floor Restoration in Bearwood

The customer from Bearwood, near Smethwick had recently moved in and during renovations discovered an original 100-year-old Edwardian tiled floor in the hallway which had covered under laminate. They were planning some structural changes to the hallway involving a new stud wall but decided to investigate having the tiled floor restored first and were keen to know if anything could be done to improve its condition.

Edwardian Tiled Floor Before Restoration Bearwood Edwardian Tiled Floor Before Restoration Bearwood

I visited the property to Survey the floor and could see given its age the floor was in good physical condition although there was a small amount of cracked tiles. Fortunately, laminate flooring is laid as a floating floor so there were no glue or screw holes to deal with. The Vestibule area however was in a worse state and had been covered in all sorts of cement screed, adhesive, grout, and God knows what.

Confident I could resolve the problems I worked out a quote which was accepted and a date was set for the work to begin.

Cleaning and Repairing a Victorian Tiled Hallway

The first day was used to make repairs to the floor, in one of the corners the floor was sloping away and had some sort of silicon filler installed where tiles had once been. After resolving the sub floor problems, I managed to level it out and used matching replacement tiles to complete this and a couple of other repairs.

Edwardian Tiled Floor During Restoration Bearwood

This left the vestibule part of the floor which as mentioned earlier was in a quite a state. To remove the mess, it took a day of scraping using several Tile Doctor products including Grout Clean-up, Acid Gel, a steamer and a lot of effort.

Edwardian Tiled Floor During Restoration Bearwood

Once complete I moved onto the cleaning by spraying Tile Doctor Remove and Go onto the tiles and then scrubbing it in with a Silicon Carbide pad fitted to a weighted rotary floor machine. The floor was then rinsed with water and the soil extracted using a wet vacuum.

Old floors like this example were laid before the invention of damp proof membranes and so you can get a lot of moisture rising through the tiles. This can lead to efflorescence as the moisture evaporates at the surface. To counter this problem the whole floor was treated to an acid rinse using more Acid Gel scrubbed in with a 400-grit burnishing pad.

The floor was then rinsed, towel dried off and air movers put in place for an hour to help dry it out. Then before finishing for the day, I applied a coat of Tile Doctor Stone Oil to help bring the colour through in the tiles. I also left the air movers to run for a few hours to help dry the floor out.

Sealing a Victorian Tiled Hallway Floor

I returned the next day to seal the floor however when I tested to moisture reading beforehand, I found the reading to be higher than expected and after cleaning and drying the floor there were still traces of moisture. Because of this I recommended that we seal the floor using a fully breathable sealer that could cope with any excess moisture.

Happy to go with my advice the floor was sealed using two coats of Tile Doctor X-Tra seal allowing each coat to dry for thirty minutes before applying the next. X-Tra can be used internally and externally and provides excellent protection so was well suited. After drying I polished the floor with a very fine 3000-grit burnishing pad to add a natural sheen to the tiles.

Edwardian Tiled Floor After Restoration Bearwood Edwardian Tiled Floor After Restoration Bearwood

I think you will agree the pictures show the transformation the floor and as you can imagine my client was very happy with the result. Before leaving I left the customer with a bottle of pH neutral cleaner to maintain the floor, we recommend using a mild cleaning product for after cleaning as it helps preserve the life of the sealer. You need to be very careful with supermarket floor cleaning products, most are bleached based and simply too strong for use on a sealed floor.

Edwardian Tiled Floor After Restoration Bearwood


Professional Restoration of a Victorian Tiled Hallway in Birmingham

Laminate Covered Edwardian Hallway Floor Restoration in Bearwood Read More »

Scroll to Top