Sealing

Victorian Tiled Hallway Floor Before After Restoration Erdington

Old Tiled Hallway Resored in a Victorian House Erdington

This customer from the Birmingham suburb of Erdington contacted me about an old tiled floor they had discovered in the hallway of their Victorian house whilst doing some renovation work. The tiles were in quite a state with ingrained dirt, adhesive, paint and some tiles were loose and cracked. The floor was so bad they were considering scrapping it and contacted Tile Doctor as a last resort just in case we could do something with it.

Victorian Tiled Hallway Before Restoration Erdington Victorian Tiled Hallway Before Restoration Erdington

I went over to take a look and could see that as well as the problems reported to me over the phone that the tiles were also imprinted with what appeared to be the pattern of the underlay that must have covered the floor previously. Curiously there were some tiles by the front door which had what appeared to be holes drilled into them. There was also a porch area in front of the main entrance that needed renovating.

Victorian Tiled Porch Before Restoration Erdington

However, I have in fact seen floors in worse state that this one and was confident I could restore it. I worked out a quote for doing the work which was accepted, and the job was booked in for a future date.

Cleaning Original Victorian Tiles

My first task was to carefully scrape off as much of the paint and adhesive as possible using a sharp knife. Then it was cleaned with a 200-grit diamond pad fitted to a weighted rotary machine, this gets into the pores of the tiles which hang on to the dirt and loosens the grime and dirt, it also helps to grind off the pattern left by the rubber underlay. The pads struggle to get into the edges of the floor so that was cleaned by hand with diamond blocks. Once I was happy the floor the soil was rinsed off with water and then extracted with a wet vacuum.

Victorian Tiled Hallway During Restoration Erdington

Next, I gave the floor an acid rinse with Tile Doctor Grout Clean-up scrubbed in with a 200-grit diamond pad again. This helped remove more dirt as well as helping to neutralize salt and mineral issues that may be present in the floor. This can be a big problem with old floors due to the lack of a damp proof membrane.

After rinsing and extracting again, I dried the floor off and went about resetting loose tiles and replacing some with replica tiles. These were grouted in along with other areas where the grout was loose and need of re-grouting.

Sealing Original Victorian Tiles

I left the floor to dry out thorough for a couple of day and then returned to seal the tiles first checking with a moisture meter that the floor was dry. We always ensure that floors are completely dry before sealing them as excess moisture can damage the performance of the sealer.

I found no evidence of dampness in the floor, so it was sealed with multiple coats of Tile Doctor Seal and Go which will add protection and works really well on old Victorian tiles where it adds a nice subtle sheen appearance. Also, being water based it doesn’t leave a smell as it dries. For the porch area which was partly open to the elements I used Tile Doctor Seal and Go Extra which is a fully breathable sealer that will cope well with the damp conditions.

Victorian Tiled Hallway After Restoration Erdington Victorian Tiled Hallway After Restoration Erdington

The floor was unrecognisable from before and the customer was very happy with the transformation. Before leaving I left the customer with a bottle of Neutral pH tile cleaner that they can use going forward to help maintain the tiles appearance.

Victorian Tiled Porch After Restoration Erdington


Full Restoration of a Period Victorian Hallway Floor in the West Midlands

Old Tiled Hallway Resored in a Victorian House Erdington Read More »

Mexican Terracotta Tiles Before and After Resealing Redditch

Mexican Terracotta Kitchen Rejuvenated in Redditch

A customer in Redditch had recently had a new kitchen fitted and prior to that had tried to seal the Mexican Terracotta tiled floor themselves, however they were not happy with the results, so they contacted Tile Doctor to see if an improvement could be achieved. The sealer they used was matt which didn’t show off the Terracotta at its best and the tile and especially the grout were not as clean as they could have been. Getting the tile and grout clean before sealing is essential otherwise you end up sealing in the dirt.

Mexican Terracotta Tiles Before Resealing Redditch Mexican Terracotta Tiles Before Resealing Redditch

To get the best from the floor I recommended stripping off the sealer, giving the tile and grout a deep clean and then resealing with a satin sealer. The customer agreed and keen to get his new kitchen looking its best booked me in to do the work.

Mexican Terracotta Tiles Before Resealing Redditch

Cleaning Original Victorian and Mexican Terracotta Tiles

My first tasks was to protect the new kitchen units from splashing with plastic sheeting and by removing the kick boards. Once done I began the process of removing the existing sealer by applying Tile Doctor Remove and Go which as the name implies is a strong coatings remover that safe to use on Tile and Stone. The product was dilated with water, applied to the tile and grout and left to soak in for about ten minutes. The floor area between the kitchen units was quite tight so on this occasion I decided to scrub the tiles with a deck brush and hand brush as opposed to using a rotary machine fitted with a scrubbing pad. The Remove and Go did the job and the sealer was removed and the floor rinsed off with water to reveal the original tiles.

Mexican Terracotta Tiles During Stripping Redditch Mexican Terracotta Tiles During Stripping Redditch

The next step was to give the Terracotta tile and grout a deep clean by scrubbing in a medium dilution of Tile Doctor Pro-Clean. Mexican Terracotta can be difficult to clean due to the makeup of the tile, but the Pro-Clean scrubbed in with the brushes I used earlier worked well. The now soiled cleaning solution was rinsed off with water and then extracted using a wet vacuum.

The customer had laid some new tiles to fit in with the new units but asked me to grout them so with time to spare before leaving for the day I grouted them in with a flexible grout and polished off any grout smears. It’s important that tiles are dry before sealing so the floor was then left for two days so it could dry out.

Sealing a Mexican Terracotta Floor

Upon my returned to seal the tiles I first checked with a damp meter that they had indeed dried. All was well, so I began the process of applying Seal and Go which is a water-based sealer from the Tile Doctor range that leaves the satin finish the customer wanted, also being water based it doesn’t leave a smell as it dries. Mexican Terracotta is notoriously very porous, so numerous coats of seal are required and in fact this floor needed eleven coats. I applied a few more coats to the new tiles so they would blend in better with the existing tiles.

Mexican Terracotta Tiles After Resealing Redditch Mexican Terracotta Tiles After Resealing Redditch

The customer was very pleased with the results and I left them with a bottle of Neutral Tile Cleaner to help maintain the tiles appearance going forward.

Stripping, Cleaning and Sealing Mexican Terracotta Floor in Redditch

Mexican Terracotta Kitchen Rejuvenated in Redditch Read More »

Terrazzo Tiled Floor Before and After Renovation Dudley

100+ Year Old Terrazzo Hallway Rejuvenated in Dudley

This post follows on from the Victorian Tiled floor article I published earlier, if you recall I was asked to restore a Victorian Tiled Hallway at a house in Dudley and there was a section that was Terrazzo, so I thought it would make sense to write about this separately as the cleaning method is different.

Both period floors were original, having been installed when the house was built over 100 years prior and whilst Victorian tiles are quite the norm in these properties it’s quite unusual to find Terrazzo as this was mostly used in large public buildings.

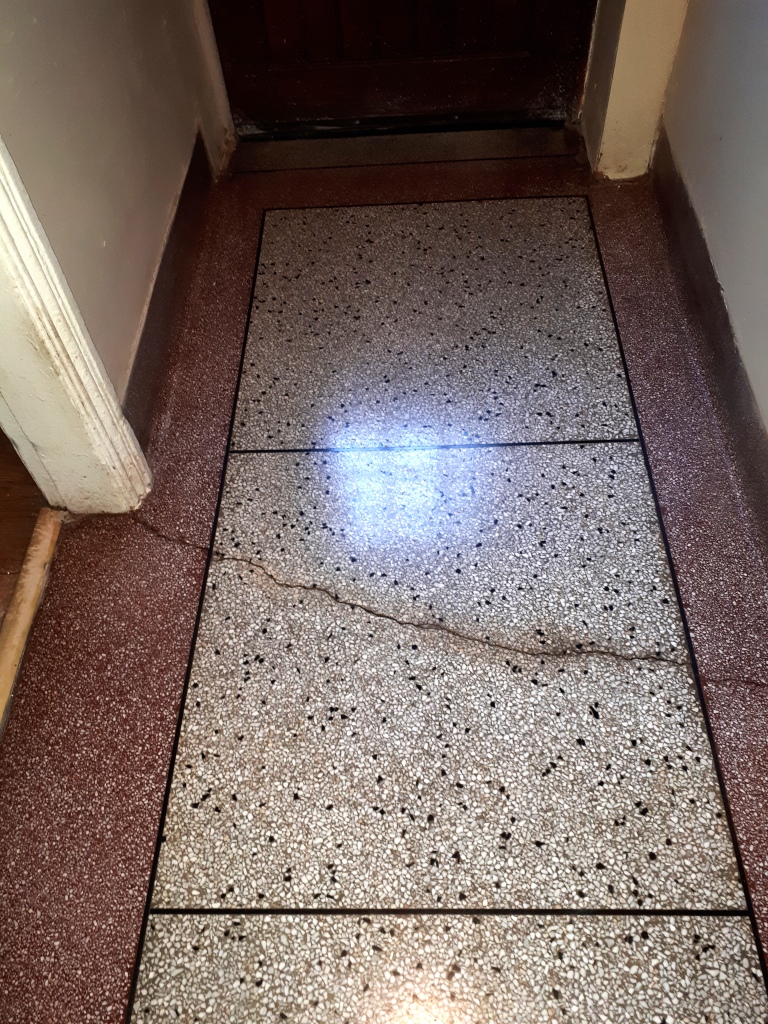
There was a crack running across the floor which is quite a common problem with Terrazzo as it’s laid in one piece like concrete and any movement in the ground will cause stress leading to a crack. Unfortunately, the only way to resolve this properly is to have a Terrazzo expert relay that section of the floor which would prove expensive.

Terrazzo Hallway Floor Before Cleaning Dudley
Terrazzo is the by-product of broken pieces of stone, often Marble, Limestone and Granite, which rather than being wasted are set into to a cement screed and poured onto the floor, then once the screed is set it is grinded to a polish.

Cleaning Original Victorian and Terrazzo Tiles

The polish on Terrazzo will eventually wear down with use and to restore the appearance it needs to be burnished with a series of pads with different grits from coarse to fine.

So, to start the renovation I gave it a general clean with Tile Doctor Pro-Clean mainly to remove any grit before burnishing. Next, the Terrazzo tiles were cleaned using a coarse 400 grit pad fitted to a rotary machine and lubricated with water. This process removes dirt and any coatings such as sealers and the floor needs to be rinsed afterwards to remove the slurry that is generated.

Then to build back the polished appearance, the floor is burnished with an 800 grit medium pad followed by a 1500 grit fine pad. Less water is used this time, but you do need to rinse the floor again after each pad to remove any slurry gets generated during the process. Once this was done the floor was dried with a wet vacuum and left to dry off fully overnight.

Sealing a Terrazzo Floor

The next day, I returned to the property and started with a damp test to make sure the floor was dry and ready for sealing. The floor was dry so I finished the Burnishing process by applying the last pad in the set which is a 3,000 grit (very fine) pad that adds the final polish to the Terrazzo.
To protect the floor from staining and dirt becoming ingrained in the pores of Terrazzo it was then sealed with two coats of Tile Doctor Colour Grow which is a colour enhancing impregnating sealer that protects from within. Once the sealer had dried the floor was buffed with a white pad.

Terrazzo Hallway Floor After Cleaning Dudley
The floor looked a lot cleaner and shiner at the end and the customer was very happy with the transformation.

Deep Cleaning and Polishing an Old Terrazzo Floor in Dudley

100+ Year Old Terrazzo Hallway Rejuvenated in Dudley Read More »

╳
Scroll to Top