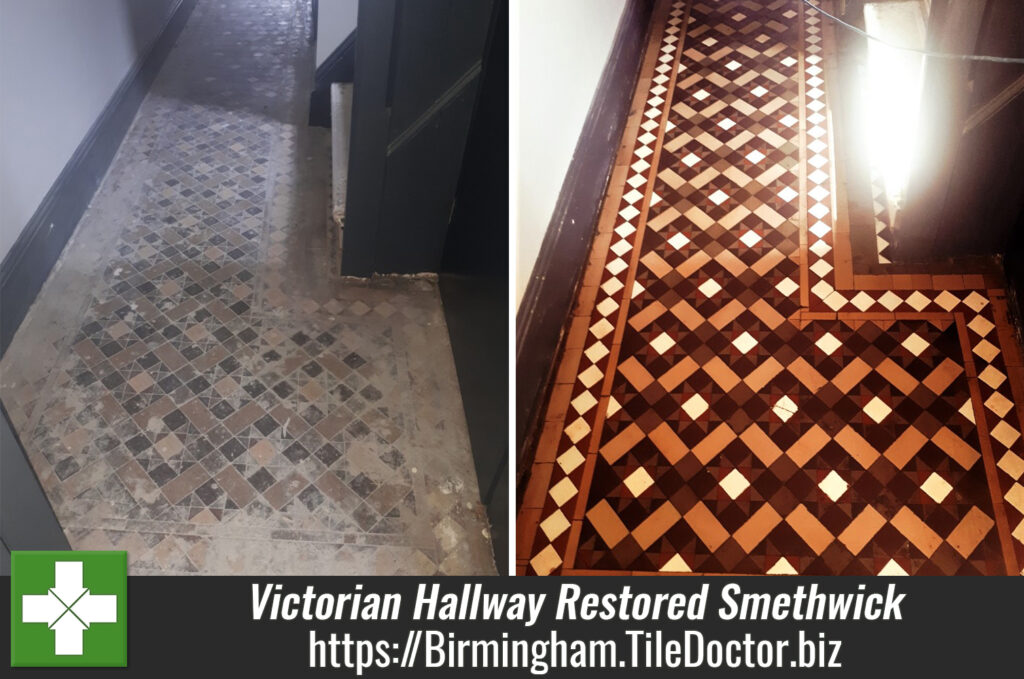
Laminate Covered Edwardian Hallway Floor Restoration in Bearwood
The customer from Bearwood, near Smethwick had recently moved in and during renovations discovered an original 100-year-old Edwardian tiled floor in the hallway which had covered under laminate. They were planning some structural changes to the hallway involving a new stud wall but decided to investigate having the tiled floor restored first and were keen to know if anything could be done to improve its condition.
 |
 |
I visited the property to Survey the floor and could see given its age the floor was in good physical condition although there was a small amount of cracked tiles. Fortunately, laminate flooring is laid as a floating floor so there were no glue or screw holes to deal with. The Vestibule area however was in a worse state and had been covered in all sorts of cement screed, adhesive, grout, and God knows what.
Confident I could resolve the problems I worked out a quote which was accepted and a date was set for the work to begin.
Cleaning and Repairing a Victorian Tiled Hallway
The first day was used to make repairs to the floor, in one of the corners the floor was sloping away and had some sort of silicon filler installed where tiles had once been. After resolving the sub floor problems, I managed to level it out and used matching replacement tiles to complete this and a couple of other repairs.

This left the vestibule part of the floor which as mentioned earlier was in a quite a state. To remove the mess, it took a day of scraping using several Tile Doctor products including Grout Clean-up, Acid Gel, a steamer and a lot of effort.

Once complete I moved onto the cleaning by spraying Tile Doctor Remove and Go onto the tiles and then scrubbing it in with a Silicon Carbide pad fitted to a weighted rotary floor machine. The floor was then rinsed with water and the soil extracted using a wet vacuum.
Old floors like this example were laid before the invention of damp proof membranes and so you can get a lot of moisture rising through the tiles. This can lead to efflorescence as the moisture evaporates at the surface. To counter this problem the whole floor was treated to an acid rinse using more Acid Gel scrubbed in with a 400-grit burnishing pad.
The floor was then rinsed, towel dried off and air movers put in place for an hour to help dry it out. Then before finishing for the day, I applied a coat of Tile Doctor Stone Oil to help bring the colour through in the tiles. I also left the air movers to run for a few hours to help dry the floor out.
Sealing a Victorian Tiled Hallway Floor
I returned the next day to seal the floor however when I tested to moisture reading beforehand, I found the reading to be higher than expected and after cleaning and drying the floor there were still traces of moisture. Because of this I recommended that we seal the floor using a fully breathable sealer that could cope with any excess moisture.
Happy to go with my advice the floor was sealed using two coats of Tile Doctor X-Tra seal allowing each coat to dry for thirty minutes before applying the next. X-Tra can be used internally and externally and provides excellent protection so was well suited. After drying I polished the floor with a very fine 3000-grit burnishing pad to add a natural sheen to the tiles.
 |
 |
I think you will agree the pictures show the transformation the floor and as you can imagine my client was very happy with the result. Before leaving I left the customer with a bottle of pH neutral cleaner to maintain the floor, we recommend using a mild cleaning product for after cleaning as it helps preserve the life of the sealer. You need to be very careful with supermarket floor cleaning products, most are bleached based and simply too strong for use on a sealed floor.

Professional Restoration of a Victorian Tiled Hallway in Birmingham
Laminate Covered Edwardian Hallway Floor Restoration in Bearwood Read More »